|
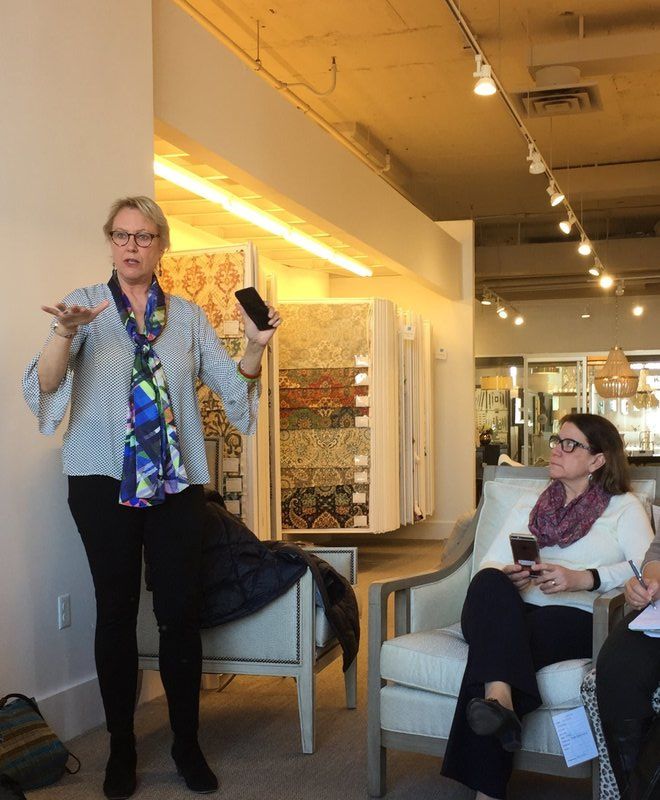
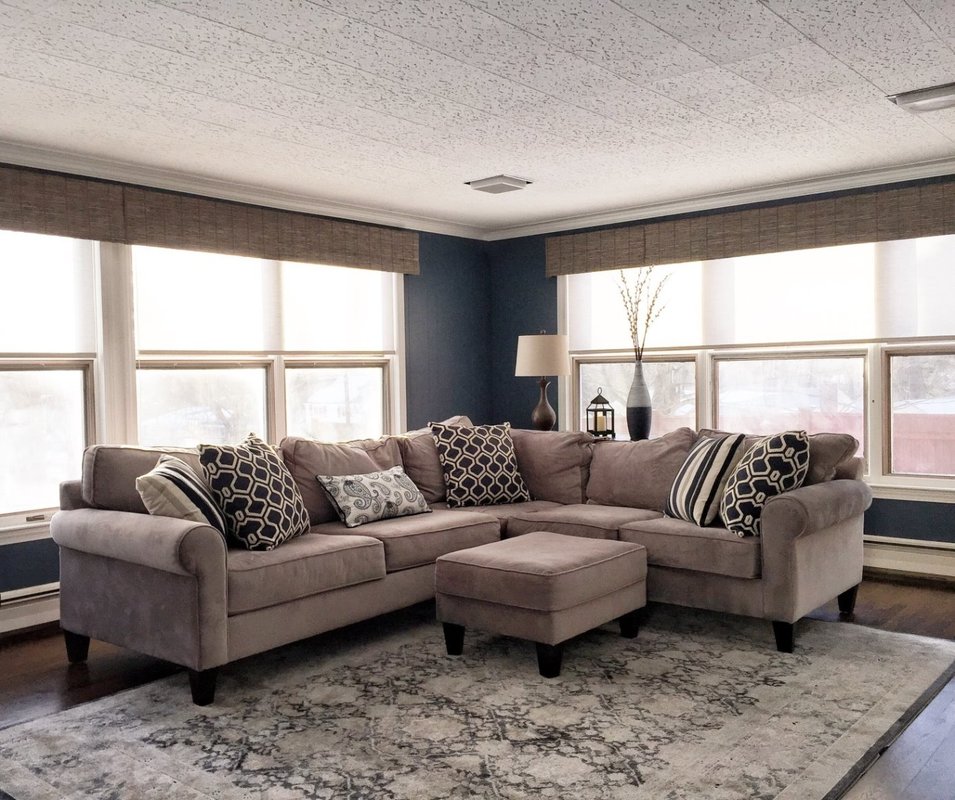
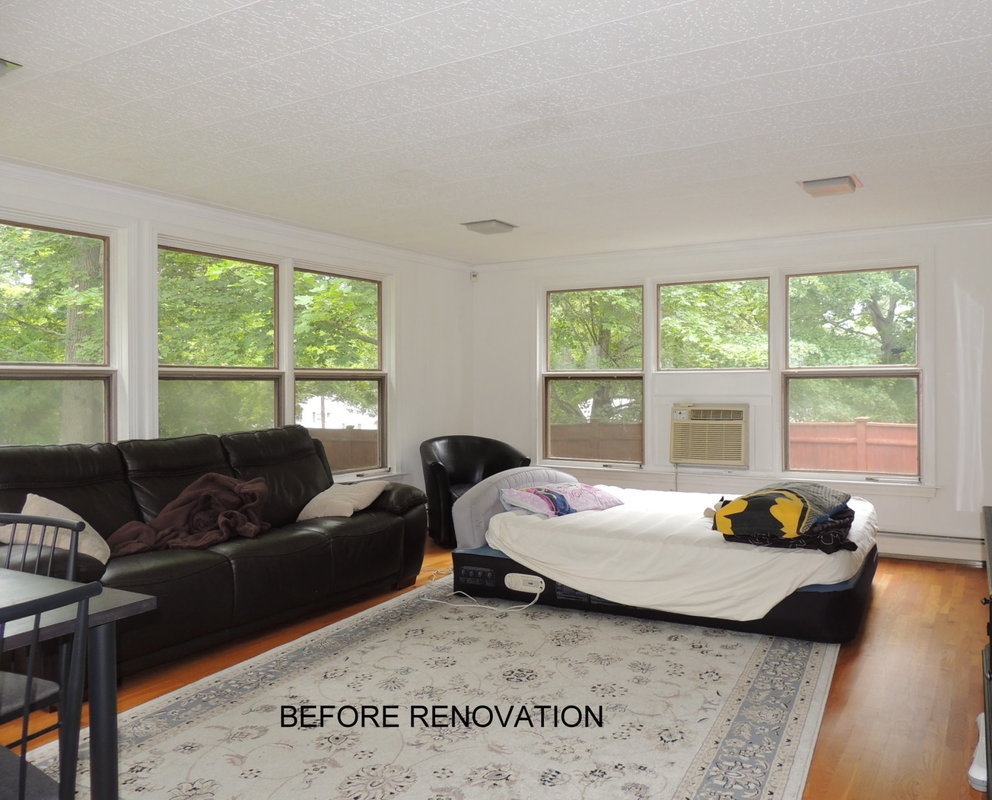
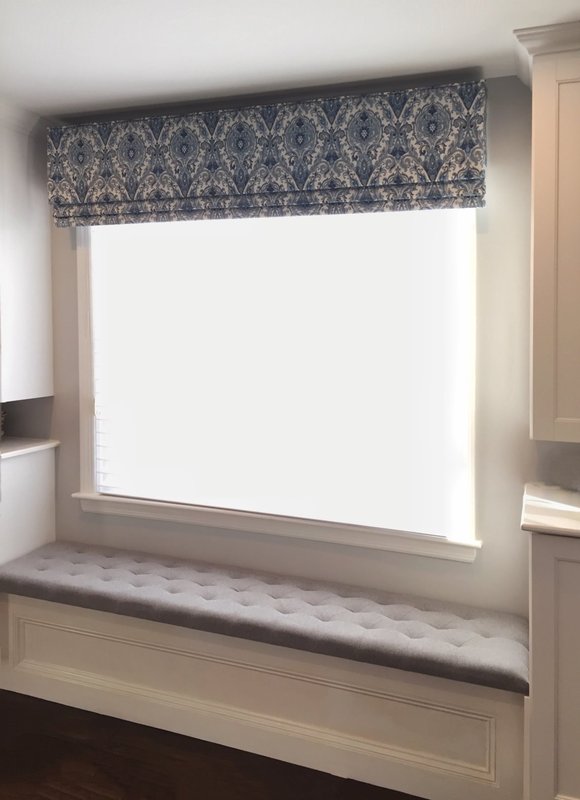
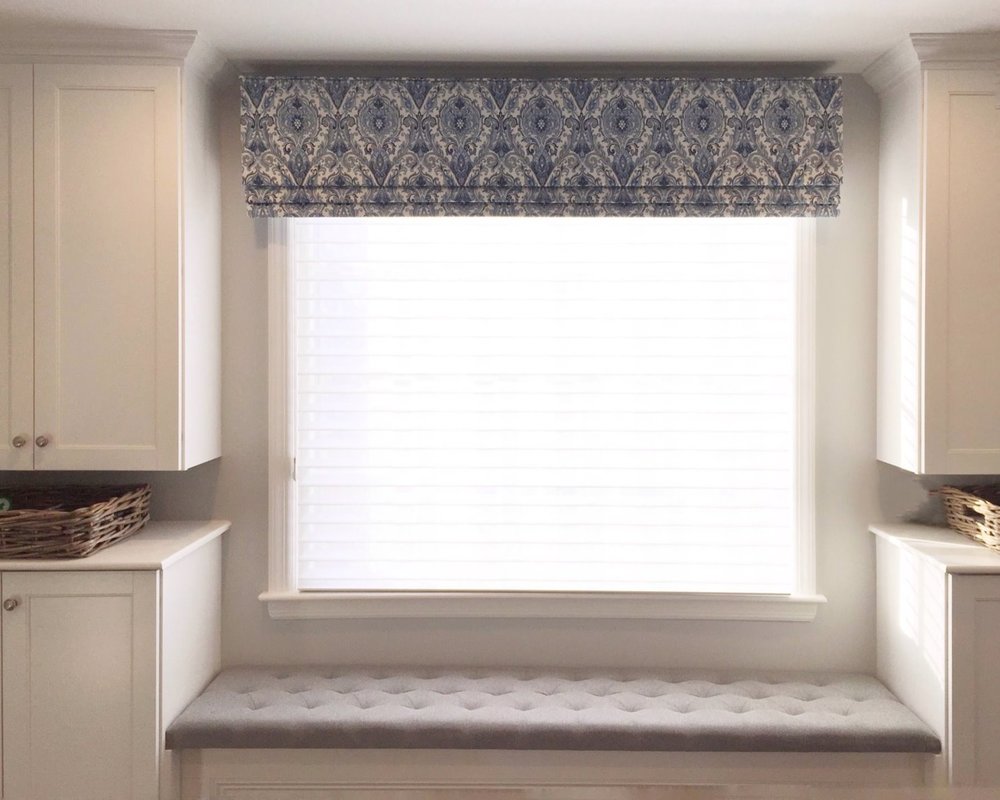
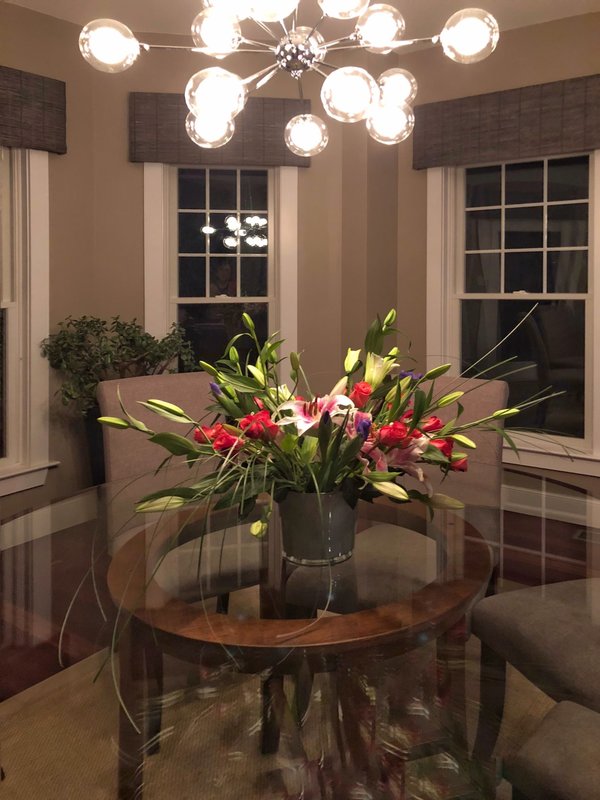
Recently I’ve delivered a number of large projects. Coincidentally I also took a photography seminar with Boston Interior Designer and professional photographer Linda Holt; a fellow interior designer who showcases her fabulous, fresh and vibrant portfolio on her website (https://www.lindaholtcreative.com/). A perfect storm of events for this week’s blog post! First, a little bit about Linda’s iPhone class and tips, or what she calls “iPhone-ography.” Cute! Linda gave a photography seminar to the Eastern Massachusetts Window Coverings Association of America (WCAA) Chapter, a professional group I belong to that is dedicated to education and networking in the window coverings and soft furnishings field. https://www.wcaa.org/AF_MemberCommittee.asp?committeeid=8 Linda’s seminar was held at the Duralee showroom at the Boston Design Center (BDC), a lovely place to shop for sumptuous fabrics in a bright and cheerful atmosphere in the Boston Seaport area. Here’s a link to the BDC (http://bostondesign.com/showrooms), which is open to the public for browsing, but if you want to purchase something you need to be with a designer that’s registered with them. So if you are interested in seeing lots of professional interior design products in one place, call me and we can go together! In the photo above Linda is instructing our group (with our past Chapter President Gabe Fitzgerald on her right). Linda described that there are two parts to better iPhone photography: taking better photos in the first place, and then doing post-processing with easily downloaded and free/dirt-cheap apps on your phone. Linda’s first bit of advice was to take better photos in the first place, making sure to get your vertical lines actually vertical, with helpful gridlines turned on in your iPhone camera.…and do you notice how straight my (unretouched) photo looks? We had a great time setting up our iPhone cameras properly and testing things out. Check out Linda’s advice on iPhone photography on her website…you will be able to wow your teenager with your iPhone prowess (well, at least for a minute or two). So what have I done to practice my new photography skills? When I delivered three projects last week, I decided to shoot the “after” shots with my iPhone instead of my larger Nikon camera. Below is a family room in Lynnfield, MA for a lovely couple who wanted a relaxing, put-together and textural family room. The only thing they started with was the griege sectional. I suggested Navy walls to give some punch to them since they have incredibly large windows. I then fabricated cornices made out of Lafayette Manh Truc woven wood material (Kaliko Smoke) http://www.lafvb.com/woven-wood-shades and put those cornices over extra wide Sheerweave roller shades from Lafayette. The couple was glad to have some privacy instead of their initial “fishbowl” setup, and the cornices on top added some textural interest without taking over with too much pattern. I also fabricated some new pillows to punch up the sofa, and the couple found a rug they liked to round out the seating area. Finally, my client accessorized the table behind the sofa himself—well done! All in all, a nice room, and a wonderful collaborative effort with some amazing and fun clients. Curious about what the “before” arrangement looked like? Here you go: The second project that I delivered last week was a new window seat in the same client’s kitchen. Here I made a tufted bench seat in a Crypton (spill-friendly) fabric with a faux roman valance over Comfortex Shangri-La horizontal shade. Think that it needs some pillows? You are so right! To try out my new photography skills and “TouchRetouch “ app I edited this photo directly on my phone using Linda’s tips. It was easy to get things straight, balance out the color, and do some magic with removing objects on the shelf with the app. Below is a straight-on shot of the bench: The last project that I delivered last week was a set of woven wood cornices to a wonderful family in Weston, MA. My client and I searched for a cool “statement” chandelier over the round table in her eating area that is in the same space as her large gray/taupe kitchen. This “Sputnik” chandelier was just the thing to fill the space, and we decided on the cornices to visually raise the windows in the room with 9’ ceilings. Here’s the after shot, “straightened” just a bit by me on my iPhone: I just love that floral arrangement….makes me think of ….SPRING. Just what we need this week, since there is still snow on the ground here in Massachusetts and it will be April this weekend.
Hope your week is a good one! Tomorrow I’m off to the 2018 International Window Coverings Expo (IWCE) in Tampa. I’ll be sure to take lots of photos with my iPhone and update you next week on all the new interior design products and looks! In today’s Interior Design landscape, there’s a great deal of free advice out there. My blog (and hundreds of other blogs) is free. Pinterest is free. Houzz is free. Asking questions of Houzz designers is free. Major furniture chains (like Ethan Allen) have designer services that are free. All free and available at your fingertips on your computer with a few simple search terms - ready to help you redesign your home’s interior. So you need to ask yourself three critical questions:
Well, it’s a bit of a consumer nightmare out there, sorting out the free wheat from the free chaff….and the sorting requires lots of time and energy spent by you! Which brings me to the following list about design fees: Why paying a design fee for a specific project is good for you:
For all these reasons, I have developed a design process that has served my clients extremely well over the past 17 years (see the “Client Journey: How We Work Together” page). And that process includes having my clients pay a design fee up front based on a clear understanding between the client (you) and the designer (me) on the scope of the project and what the client will get for that design fee (e.g. photographic renderings, fabric swatches, wallcovering samples, paint selections, pricing, time estimates, etc.,). As a client of any service, don’t you want to know what you are going to get, how it’s going to look and what it’s going to cost? Of course you do! I can think of many instances in my own personal life where I’ve paid an up-front “design fee” to start a project out on the right footing. For example, when we were first married we moved to Colorado, purchased a new home and paid a landscape architect to draw up a detailed landscaping design. Frankly, we had no clue on the trees and shrubs that grew in Colorado’s climate, and it would have been way too laborious and inefficient for us to research it ourselves. That’s what you hire any professional for, right? With the landscaping plans we paid for we could make informed decisions on what we were going to do and when. We ended up using that architect’s landscaping company for the major initial work and did many of the smaller jobs ourselves on a time phased approach. We were happy that we had the structure of the architect’s design plan to guide us on the overall project, the costs and the time phasing. Similarly, years ago we paid an investment advisor to perform a comprehensive financial review and design a retirement plan, with no risk of him selling us specific investment products that were more financially rewarding for him than they were for us. We were seeking a high-quality, objective and informed professional opinion. To get that we paid a design fee to the investment advisor, and therefore spent time specifying our needs and paid attention to, and placed value on the plan that he developed. And it’s no different with a professional Interior Designer (except Interior Design projects are way more fun!)
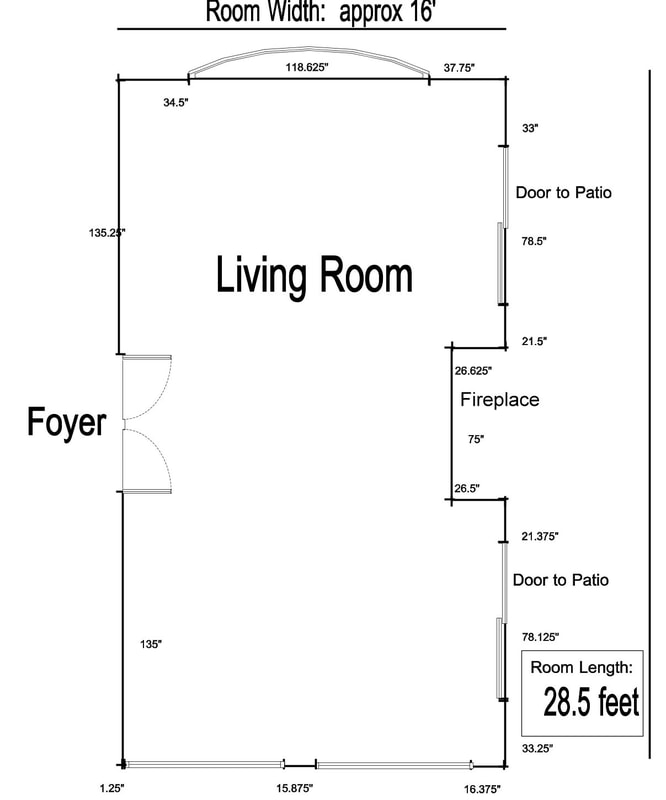
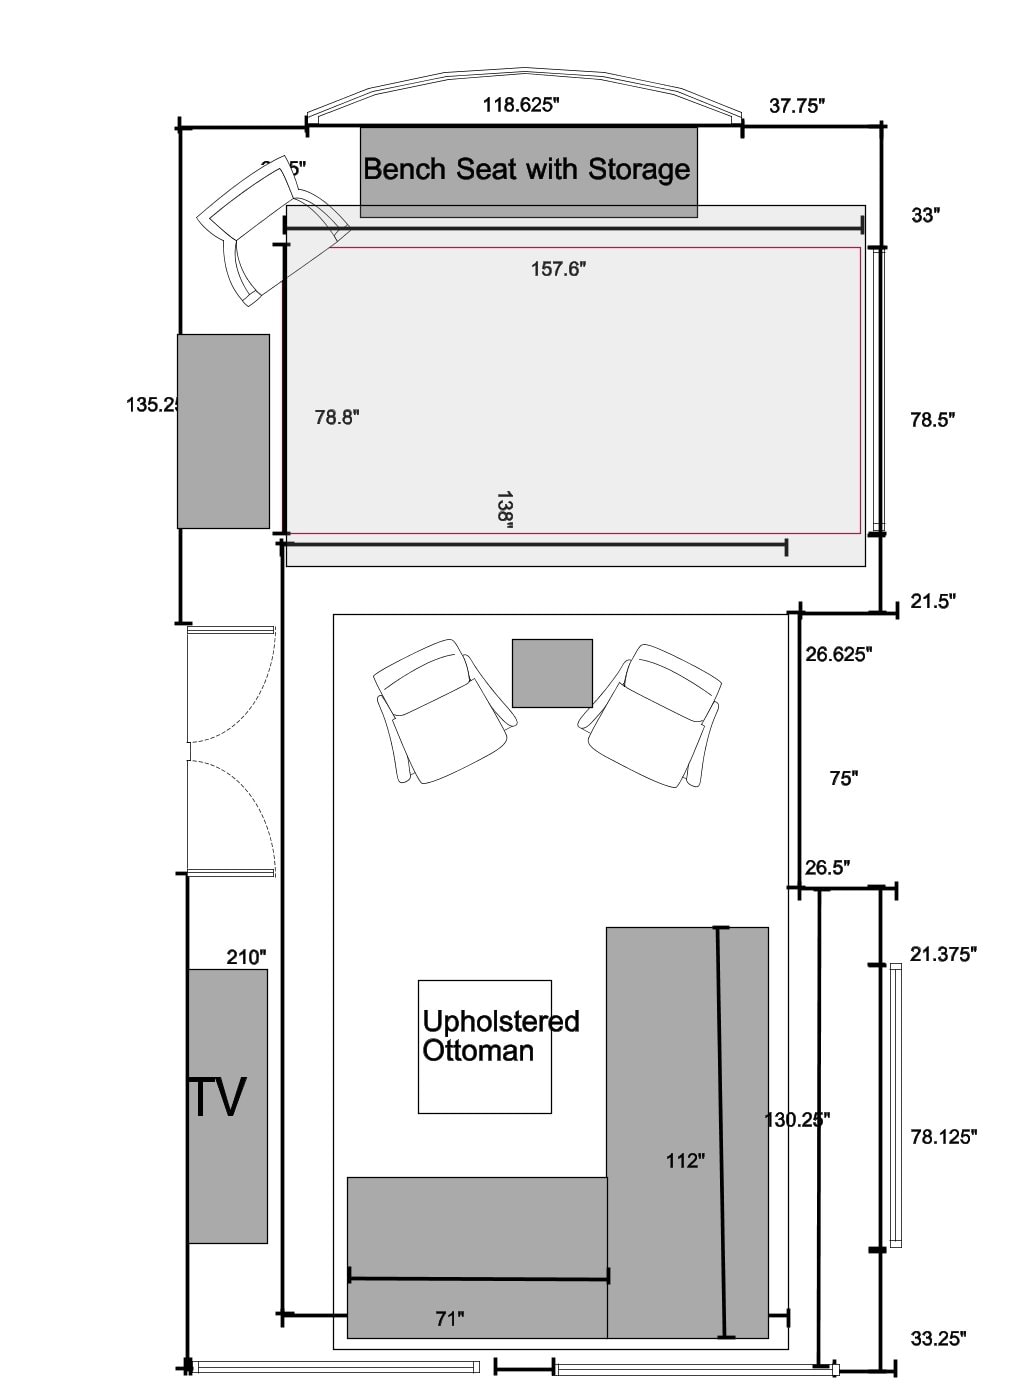
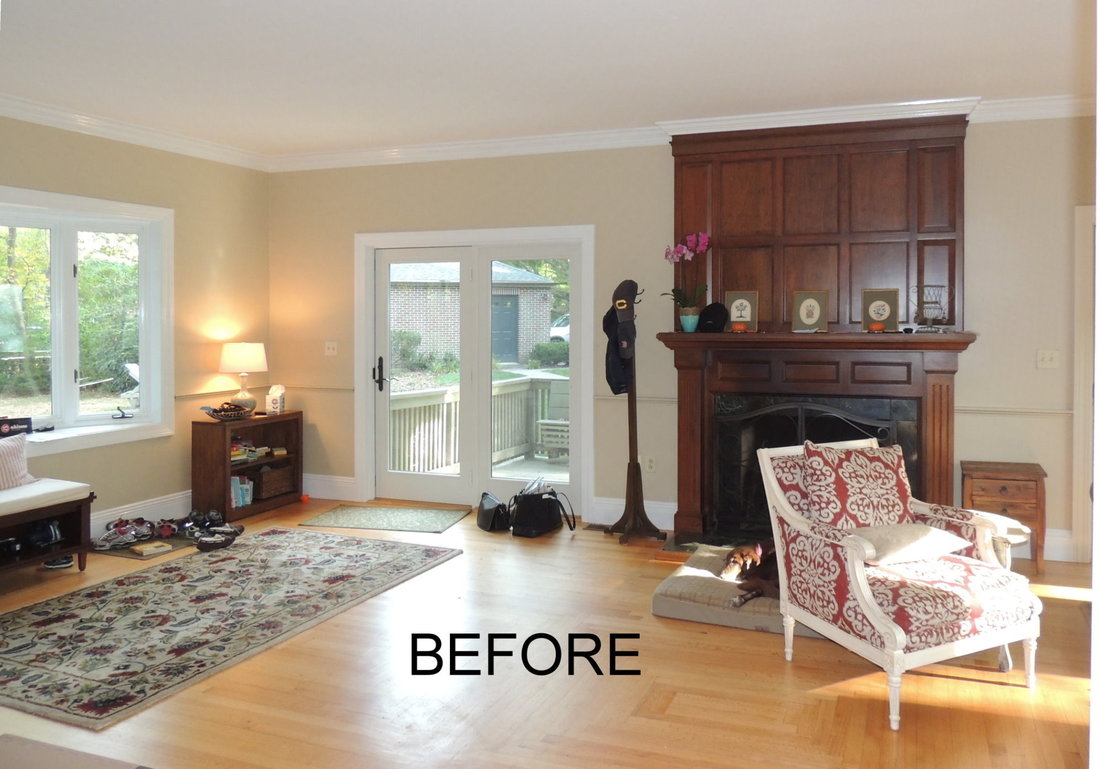
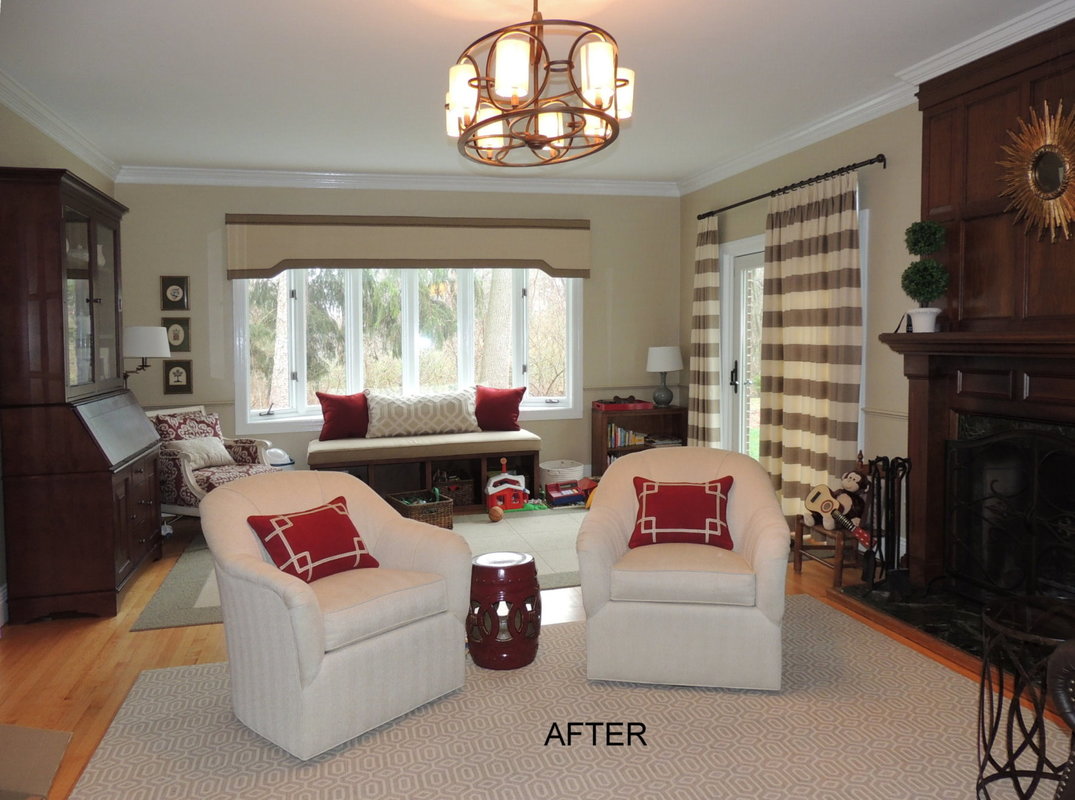
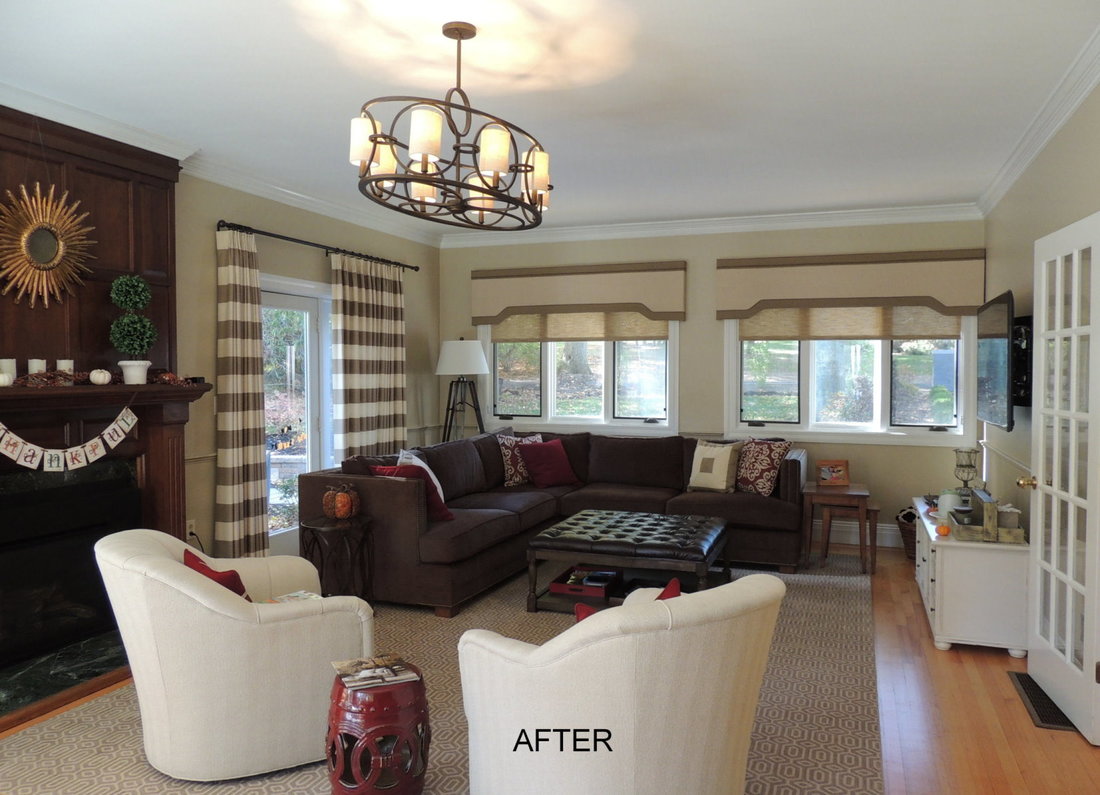
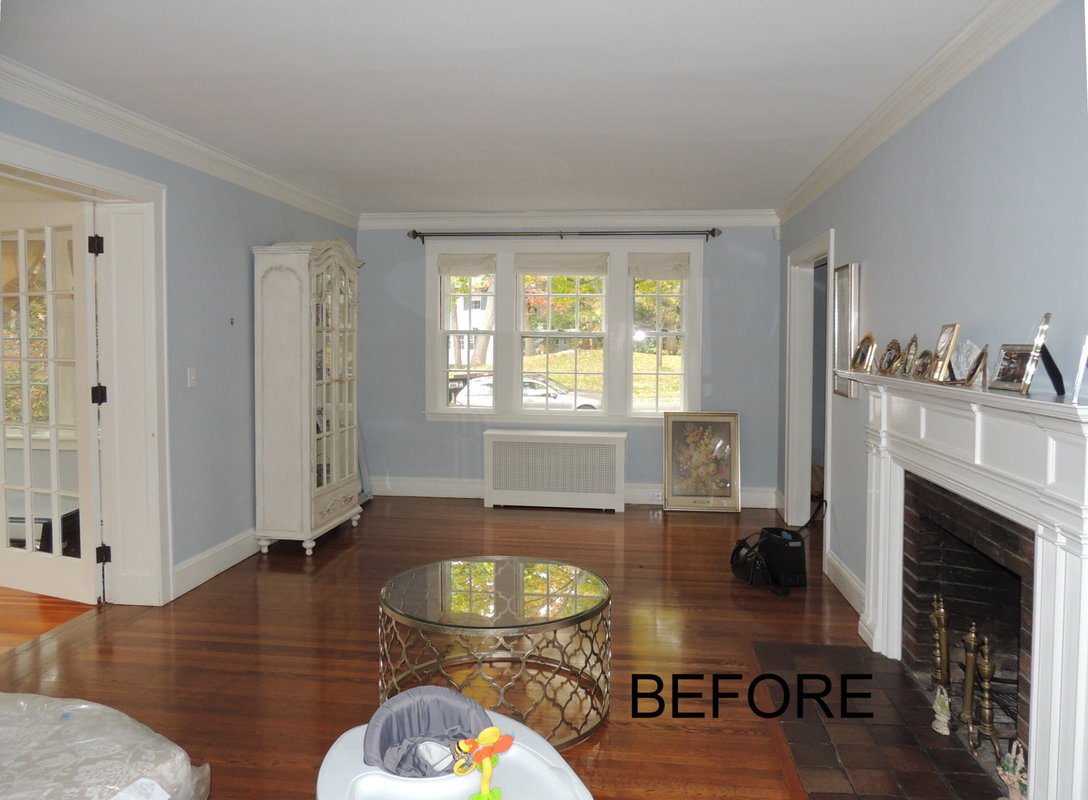
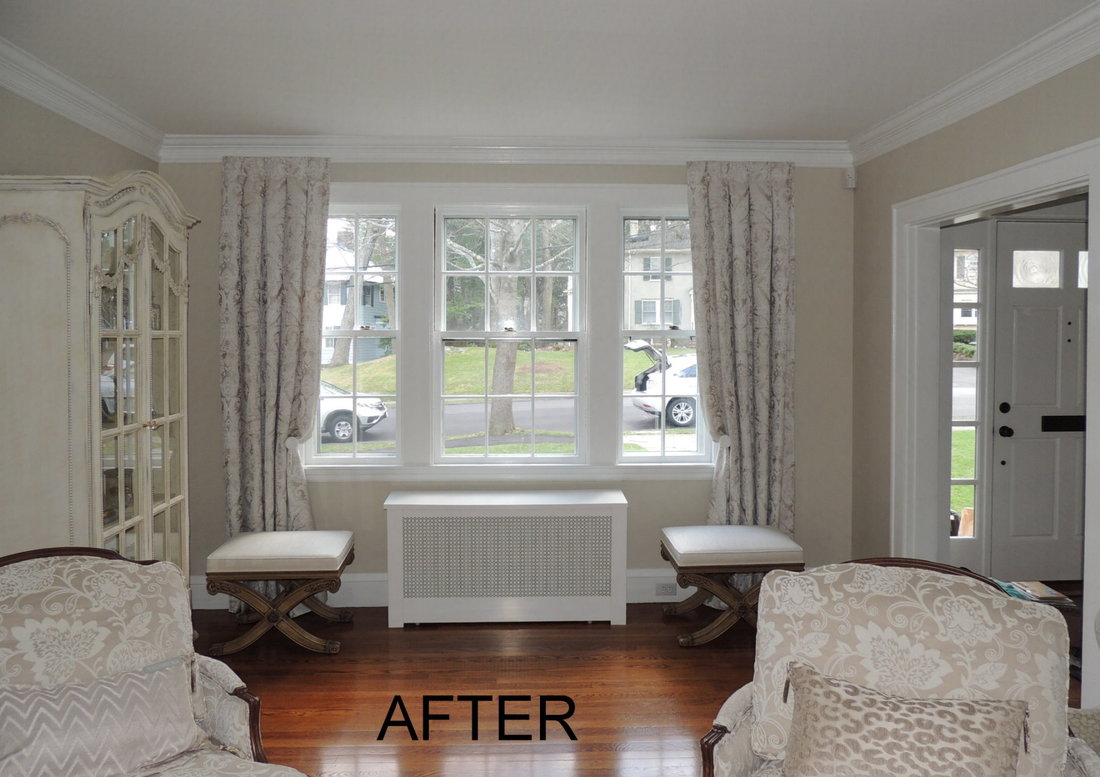
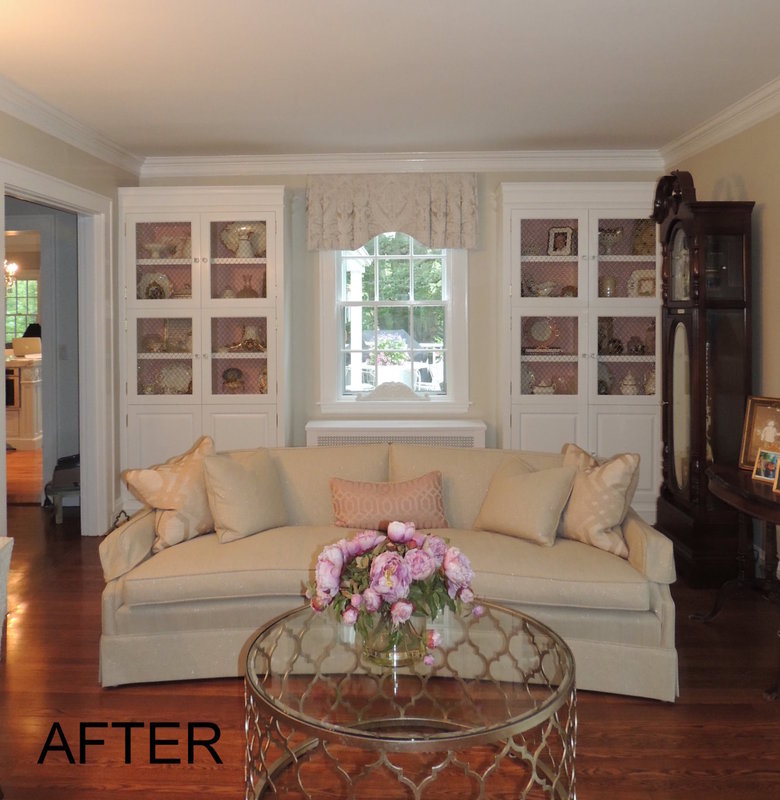
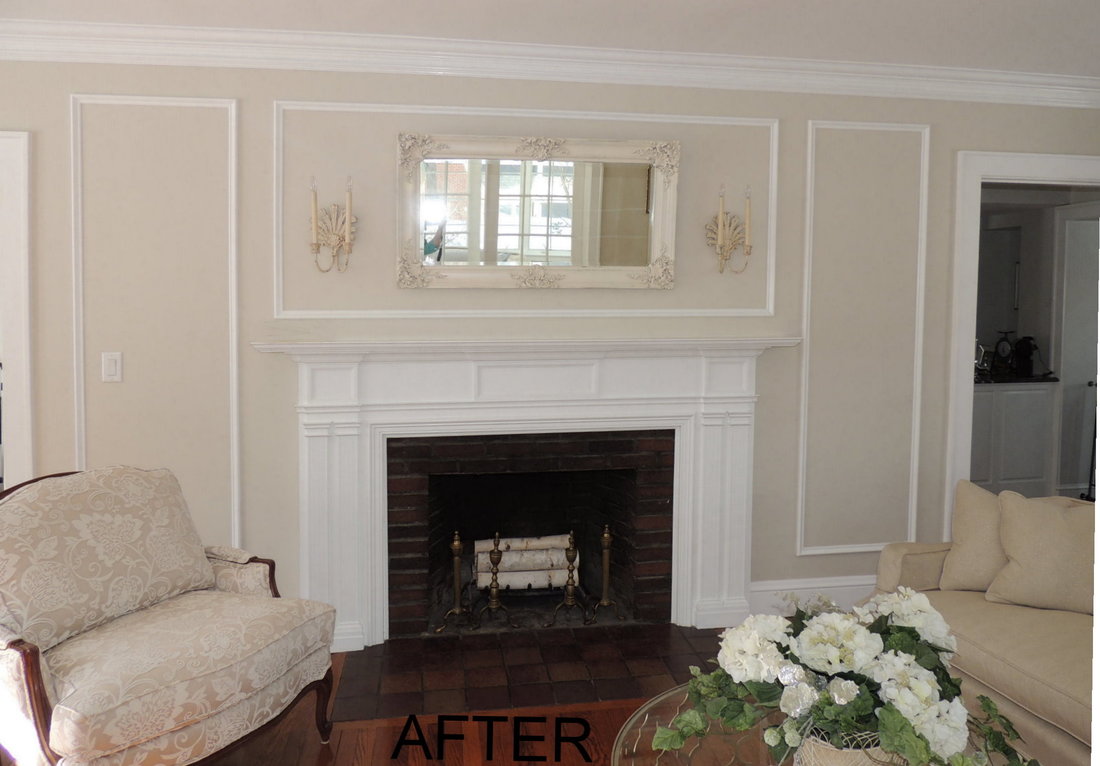
So now I’m going to make a statement that will probably make you wince: “Nobody values decorating advice they don’t pay for.” Yes, it’s true. Free decorating advice from the internet is valued as much as asking your mother-in-law, sister, best friend, or pet. Harsh words, but it’s true! We value what we pay for…….maybe it’s because we have to invest our time in doing the research to find the right person to pay for advice. Think about it! When was the last time you took professional advice that came for free from a Doctor, Lawyer or Plumber? In my opinion, if you have a significant decorating project you need interior design help and advice, and you probably know it. The good news is that this help can be extremely beneficial in terms of money and time spent, and in the happiness that comes from getting it right the first time! As a designer who charges a design fee I can assure you that doing this aligns us and makes sure that I have your unique goals and interests at heart. I can help, and you will be amazed at what we can accomplish together! Call me at 978-440-7264 so that we can get started on the project that you keep putting off. This week’s post is a “Before and After” look at two of my favorite projects that transformed the spaces for busy Boston families. These projects have a common design challenge: front-to-back living rooms (henceforth referred to as FTB). Space planning for a FTB living room is often tricky - how to make the typically long but narrow room cozy and functional, while accommodating the traffic flow to multiple doorways. Starting out with a blank slate, it looks like you have a good bit of square footage in a FTB room to work with, until you try out different configurations and suddenly the room appears to shrink dramatically! Project #1: Multi-use Front-to-Back Living Room The Problem: In New England, a FTB living room (or family room) typically has the fireplace centered on the long outside wall like in the diagram of my client’s home below. This particular family room is fairly generous in width (about 16’ across), unlike many other FTB living rooms I encounter that are far narrower - more like 12’. But the 16’ dimension was fortunate for this home, since there is only one “common area” and this room must serve as both family room and living room. Thank you, kind architect! The overall dimensions of this room are 16’ across and 28’ long, or about 450 square feet. Plenty of room for the multiple purposes my client intended: a large seating area for entertaining, TV watching, play space for her toddler, and a thoroughfare to enter the home from the patio through the sliding door at the top of the diagram. There is a pretty bow window to the North, and twin large windows to the South, facing the front of the home. So, what was the challenge with this space? First, we needed to come up with a toddler friendly plan (with toys) that could morph with a tiny bit of clean-up into a sophisticated entertaining place for adults. All you folks with kids are well aware of the creeping plastic jungle! Second, we needed seating for 6 or 7 people in a conversation area, since the family has many relatives in the area and they often have company. The TV needed to be large for sports viewing by an enthusiastic crowd. And third, the carpeting needed to be kid friendly and withstand in-and-out traffic through the sliding doors (to the North), often with mud and snow in the mix. Lighting was an issue too, as there were no overhead lights and the room could not be solely lit by lamps around the perimeter. The Solution. My solution to the space plan issues was to have 2 separate carpets forming two zones: the gathering zone with a large sectional facing a TV on an interior wall, and the toddler zone with a custom storage window bench. The swivel chairs function in both zones, but in the regular configuration, they face the sectional. The carpet in the kid zone is from Flor (https://www.flor.com/), with individual carpet tiles easily put together (by me and the homeowners) for our custom arrangement. Flor carpet tiles offer terrific peace-of-mind during life with children, durability, and unlimited design options. I have used Flor tiles in many homes, and my clients have all been very happy with them. To improve the lighting we installed a large ceiling light fixture in the center of the room, high enough in this space with 9’ ceilings to permit foot traffic underneath. We also had a sectional custom made from one of my favorite furniture manufacturers, Mitchell Gold + Bob Williams: https://www.mgbwhome.com/sectionals/ To reduce the clutter we ordered a large tufted leather ottoman with storage underneath. In the kid zone, we had a custom storage bench made and placed baskets into the cubbies for toy storage. As you can see from the photos below, we were able to use many of my client’s existing pieces, like the secretary and red chair. And finally, I made all the window treatments in Sunbrella indoor-outdoor fabrics (the ultimate in kid friendly). Here are some photos of the room, before and after. Project #2: A Far Narrower Front-to-Back Living Room The Problem: This home in Lexington, MA is a beautiful home built in the 1920’s, and it has undergone a few major additions through the years spreading out from the original living room. But the living room dimensions remain intact, and you can see from the photos below that this is a rather narrow room, with three doorways to plan around: an opening by the front door, an opening by the kitchen (both openings flanking the fireplace, which is on an interior wall), and a third double French-door entry to the sunporch opposite the fireplace. Traffic flow is important in this living room, but since the home has a large family room to the rear of the home, TV-watching and childrens’ play areas weren’t part of the space planning challenge. And we could make this home extra pretty to play up its fine architecture and built-in cabinetry. The Solution. With the narrow space, the only solution was to float the sofa and the two chairs in the center of the room with the fireplace as the focal point. Unfortunately, there is limited room for seating. But the two “X” benches that we put in front of the new draperies by the front window serve as extra seating for company. In terms of lighting, we added sconces by the fireplace and picture-frame molding on that wall to give it a little style boost. We took the color cues for the wall color (Benjamin Moore Alaskan Skies, 972) from the upholstery on the Bergere chairs, for a serene sitting room with a decidedly French chic flair. My client loves blush pink, and with two small boys, she needed some pretty pink in her busy lifestyle! I have another project in the works right now for a front-to-back living room to be used as a music room. I will let you know how that works out! I do love the FTB configuration, as these rooms generally have plenty of natural light. But they do pose a bit of a challenge for space planning. It’s not insurmountable, just takes a bit of thought by your designer (that would be me). Call me if you have a front-to-back family room or living room that is giving you trouble. I can help!
|
Barbara PhillipsBarbara Phillips, interior designer and owner of Center Stage Interior Designs, has delivered impeccable window treatments and design services to both residential and commercial clients in Massachusetts since 2001. Categories
All
Archives
March 2021
|





 RSS Feed